
If you are willing to share your computer with your friends or others, you might wanna hide your files or folder for personal. 3ir6o
There are many ways to hide your files and folders or even the whole drives in Win 10. This boosts your security.
Now you can use the Windows default setting to hide your stuff or you can use special software for that purpose.
So today we are gonna cover both methods the Windows default setting and the software.
1- Hide Individual Files/Folders On Windows 10 Using Command Line h343t
So the first way of hiding your files is by changing its attributes by using the attrib command in the command line.
Let say you won’t hide your important document(Imp.docx). To begin with open the command prompt by using Win+R key or by simply going in the start menu and type Run. After that type in cmd.exe and click OK.
Once you have clicked ok a black window might appear(Command Prompt). In there type the following command to replace and hide the file;
attrib C:\s\Steve\Documents\Personal\Imp.docx +s +h
The +s and +h are the attributes command that you will use at the end of the file you wish to hide. The +s attribute is the system file which indicates that the file you chose to hide is now for the use of the operating system and is not displayed.
The +h attribute is the hidden file attributes which shows you that the selected file will not be displayed in the list where it was previously been.
Point to note is that attributes are not case sensitive so may write in lowercase as well as in uppercase.
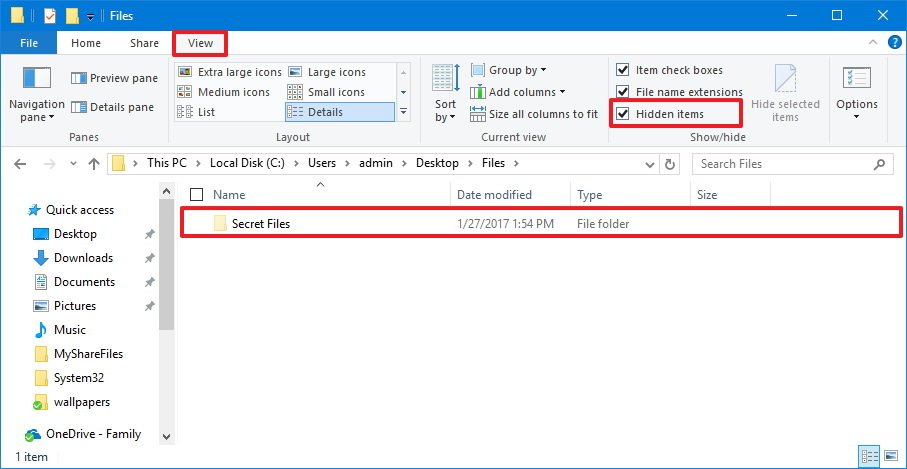
So now when open the folder where the file was been it will not be visible even if you go to View—-Details—–Show/Hide and checking it
You can now also use this method to hide the folder by the following. Replace the path with your folder name;
attrib C:\s\Steve\Documents\Personal\AnotherFolder +s +h
Now to unhide it simply type “-“ instead of “+” at the beginning of s and h
attrib C:\s\Steve\Documents\Personal\AnotherFolder –s -h
If you want to learn more about the attrib type attrib /? On the command prompt.
2- Hide Windows 10 Folders Using File Explorer 3o415o

You can use file explorer to hide your files or folders but it is less secure. Anyone who knows the show and hide feature in the file explorer can easily access your info but, if you are hiding let say from your family member who is less in technology then this might work for you.
So the first thing before you hide your files or folders is to make sure that the hidden attribute doesn’t display. Go in the VIEW MENU>OPTIONS>CHANGE FOLDER AND SEARCH OPTIONS.
A new window will appear then, go to the VIEW tab and select Don’t show hidden files, folders, or drives and click OK. Now when you are done with that you may proceed to the next step is to hide your files/folders. So go to your desire files or folders and right-click on it.
After that select Properties, a window will pop out. Go to Advance under the General Tab. Uncheck the File Attributes of the Advance Attributes settings and hit OK.
For unhiding the files go to file or folder and right-click. Then go to Properties and under the General Tab, you will find Hidden in the Attributes section right beside the Advance option. Just uncheck the hidden box and you are ready to go.
3- Hide The Entire Drive In Windows 10 Using Registry Editor 643k6i
This method will enable you to hide the entire drive rather than a file or folder. But before you do I highly recommend you to backup your registry.
If you are not comfortable using the registry method you may opt for Disk Management Utility which I will later discuss.
So to open Registry Editor you need to first open Run by pressing Win+R key or by simply from the start menu.
Once you have opened it type regedit hit enter and a new window will appear.
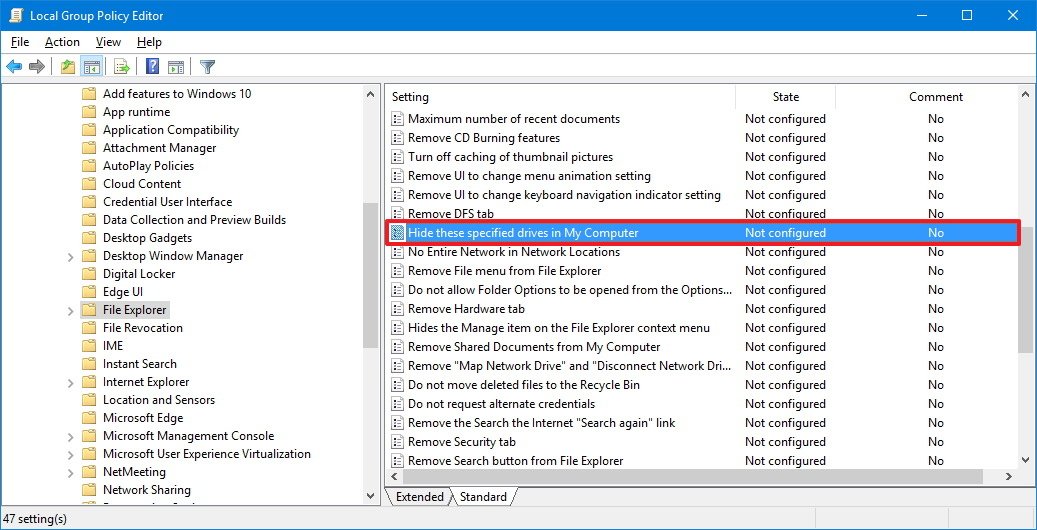
Now from you will HKEY_LOCAL_MACHINE click on it and then go to Software>Microsoft>Windows>CurrentVersion>Policies>Explorer. That’s a long way to go anyway, right-click on the explorer and then click on new here you will DWORD (32 bit) Value.
Once you are in it under the name write NoDrive and then select Decimal as the base. Then enter the corresponding value to drive/s. To make things easier I have mentioned the table below.
| A:1 | B:2 | C:4 | D:8 | E:16 | F:32 |
| G:64 | H:128 | I:256 | J:512 | K:1024 | L:2048 |
| M:4096 | N:8192 | O:16384 | P:32768 | Q:65536 | R:1310728 |
| S:262144 | T:524288 | U:1048576 | V:2097152 | W:4194304 | X:8388608 |
| Y:16777216 | Z:33554432 | All:67108863 |
With the help of this table find the number of the drive you wish to hide and type it in the Value data box. In this example our NoDrive is G: therefore we will put the number 64.
If you want to hide more than one than simply add the drive number and put in the value box.
Like if you want to hide drive A:, B: and C: so, just add there corresponding number 1+2+4=7. Type 7 in the Value box and click OK.
After you restart your PC you will not be able to find the drive.
If you want to show it again go to Registry Editor and delete the drive, in this case, No Drive value under HKEY_LOCAL_MACHINE/Software>Microsoft>Windows>CurrentVersion>Policies>Explor-er key and then restart your computer. You will able to see your drive again.
4- Hide The Entire Drive Using Disk Management Utility 5v4i66

Now if you are not willing to use the above method which is the Registry method to hide your drive then you go for this method (Disk Utility Management).
The great thing about this is that it shows you the internal as well as external devices that are connected with your computer.
To start with go to start menu and type Run or press the Win+R key to open Run.
After that type in the word diskmgmt.msc. Once you entered it a Disk Management window will appear. Right-Click on the drive you want to hide and select Change Drive Letter and Paths.
On its dialogue box select the drive letter, then click Remove and hit OK.
A dialogue box will appear and tell you that some features might rely on this particular drive. If you are 100% sure to hide then drive then go ahead and click Yes.
Now the drive is removed. Once close and then reopen the file explorer the drive will no longer be visible and you can’t search it too.
To make it visible again go to the Disk Management utility and open Change Drive Letter and Paths. Then click on the add.
Now you have to make sure that the “ Assign the following drive letter” is checked(it should be in default).
Then select the drive letter from the dropbox and click OK. Then simply close and reopen the file explorer for the drive to magically appear.
5- Hide Folders In Windows 10 Using Third-Party Application 245o1u

This was the method I believe you’ve been waiting for. Well, the wait has been over. Right! So the previous method may not be as secure as using this software.
There are multiple software you can use to hide your files and folder through protection. I have used this type of software and they work well.
Here is some software that might suggest you to:
[box title=”” border_width=”2″ border_color=”#fff2e5″ border_style=”solid” bg_color=”#fff2e5″ align=”left”]FileFriend: 5j6r60
- The first software we are gonna look at is FileFriend. This software can keep your file and folder safe via which is very useful. So to hide your files first you need FileFriend there will be a link down at the end. Once you it go ahead and open it.
- Once you open it you will see a JPK tab, this will hide your files and folder in JPEG(image). You can even use a for security
- Their other feature as well that you may check.
- Link: http://www.filefriend.net/
Secret Disk: o3d4d
- Next, we have the secret disk. This software allows you to create a virtual disk, which is invisible, and on top is protected. Unlike FileFriend, Secret Disk uses a PIN feature to access the software its self. This is a bonus feature that not only you secure your file with a but also you secure your software by using a pin.
- When the repository is visible it displays the drive letter on to your file explorer from which you can add and remove data just like a normal drive. Once you are done with you can then hide the repository and make it vanish.
- The Secret Disk doesn’t format your hard drive nor it encrypts the files or folders. It just limits the access by hiding and using the .
- There is a PRO version of it for $14.95 which as a feature to add more than one drive/repository and choosing the drive letter for each repository.
- The and pin of the repository are optional in the PRO version but you should leave it enabled.
- Link: https://privacyroot.com/software/www/en/sede-.php
Easy File Locker: 7rc
- Another software that allows you to protect your files and folders.
- This freeware software is easy to use. As mentioned before it protects it from hiding the files and folders so that no can get access except the one who is using.
- Once it is protected you or no one is allowed to copy, modify, open, delete, and renaming. All files and subfolders are locked and protected.
- To set a open the program and in the System Tab menu select Set . If you don’t set a than your files and folders will not be protected and can be accessed by anyone or everyone who uses your computer or laptop.
- Use the Add Files and Add Folders to add your files and folder. Double click on the folders or files you added to change their permission( Visible, Editable, Deletable)
- To enable the protection feature simply click on the Start Protection button and to make your file visible again click on the Stop Protection button
- Link: http://www.xoslab.com/.html
My LockBox: 6c2a32

- Like others My LockBox also allows you to not only hide but to protect your files and folders using a .
- When you are installing the software you will be asked for the location of the file you want to hide. Once the software is installed your files or folders will automatically be hidden and locked.
- Now there will be two icons added on your desktop. My Lockbox and My Lockbox Control .
- My Lockbox will give quick access to unlock and open protected files. For more options you will use The My Lockbox Control .
- OK! Once you have entered the a window will appear. There will be a button under the name Set Folder. Use this option to change what you wish to protect.
- The Remove button will unlock the program and removes it from the program its self.
- The Open button will automatically unlock and open the folders/files. You can use the Lock and Unlock feature on the left side of the windows and Advance for more settings.
- As all the freeware version does is that it allows you to hide and protect the only folder with unlimited subfolders.
- If you want to hide and protect more than one folder you might wanna buy the pro version of it which is My Lockbox Pro
- Here is the link to the freeware version: https://fspro.net/s/.
The Method of Hiding Files and Folders that Didn’t Work in Windows 10 6ahb

These are another false method to protect and hide your files. The reason that I am covering is that some of you heard about this technique may be going to apply it. But I have tried these two and it didn’t work.
Hide Windows 10 Files/Folders In a Jpeg Format
Now I have tested this method of hiding files in JPEG format by using the following command line and to be honest it was a success;
copy /b C:\Path\To\File\OriginalImage.jpg + FilesToHide.rar C:\Path\To\File\NewImageWithHiddenFiles.jpg
but, the drawback was that I was unable to extract a file once it was added in Jpeg file. I used all the extraction software like WinRAR and zip.
So if you want to hide a file in Jpeg format than it is possible using FileFriend which I discussed in HIDING A FOLDER USING THIRD PARTY APPLICATION.
Hide A Folder in Windows 10 by Redirecting to the Control 1e5e3x
There is another method on the market and it is by redirecting it to the control . So in this method, you will have to make two batch files.
Once that lock it and the other unlocks it. The opening will take you to control
Now I have tested in win 10 as well as in 7 and 8 and once I was successful in locking or hiding the file the I was unable to open it.
But if you are curious to try it yourself then these are the step to follow:
- Create a folder called s or Fonts and put the files you want to hide into it.
- Then create a new text file and copy these commands.
- Replace the name with your folder name and save this file as lock.bat ren s s.{21EC2020-3AEA-1069-A2DD-08002B30309D}
- After that create a new text file and copy and paste the following line. Again replace the name with the folder but this time save it as key.batren s.{21EC2020-3AEA-1069-A2DD-08002B30309D} s
Both batches should be in the same folder as the folder you are hiding it. By double-clicking the lock.bat it will redirect you to the control .
To open your file double click on the key.bat file. Note you should not key.bat file with hiding folder. Just copy when you want to unlock.
Conclusion: 3d5f3w
Hiding your info like files and folders without a is not an ideal case.
It doesn’t make any difference if you hide your with no , someone can access it.
To make it fully secure you need to use the third party software which I highly recommend it as not only it hides the file but it also secures or protects it via a .